Illuminate Your Creativity: Discover the Perfect Lighting for Stunning Content!
In the world of content creation, whether you're a budding YouTuber, an Instagram influencer, or a professional photographer, lighting for content creators plays a pivotal role in shaping the quality of your videos and photos. Poor lighting can turn an otherwise great shot into something unwatchable, while the right lighting can elevate your content to professional standards. As the demand for engaging and high-quality content continues to rise, so does the need for effective lighting solutions. Understanding how to harness light to your advantage can significantly impact your creativity and the way your audience perceives your work.
Understanding the Basics of Lighting
To truly master content creation, it’s essential to grasp the fundamental principles of lighting. One of the most widely used techniques is the three-point lighting setup, which includes key light, fill light, and backlight. The key light is the primary source of illumination, while the fill light softens shadows created by the key light. The backlight adds depth and separates the subject from the background. Additionally, understanding color temperature—measured in Kelvin—helps in achieving the desired mood. For instance, warmer light (around 3000K) creates a cozy atmosphere, while cooler light (around 6000K) feels more clinical. Shadows also play a crucial role; they can enhance the depth and texture of your content or create unwanted distractions if not managed properly. By mastering these elements, you can significantly influence the mood and tone of your creations, making your content stand out.
Types of Lighting Options for Content Creators
Content creators have a plethora of lighting options at their disposal, each with unique benefits that suit different types of projects. Understanding these options can help you choose the best lighting setup for your needs.
Natural Light
Natural light is a favorite among many content creators, particularly for outdoor shoots. It’s free, abundant, and generally flattering. To effectively utilize natural light, timing is crucial. The golden hour—shortly after sunrise or before sunset—provides soft, diffused light that enhances the beauty of your subject. Positioning is also key; facing your subject towards the light source can create a beautiful glow, while backlighting can produce dramatic silhouettes. However, be mindful of the weather and time of day, as these factors can drastically change the quality of natural light.
LED Lights
LED lights have gained popularity due to their versatility and energy efficiency. They come in various shapes and sizes, making them easy to transport and set up in different locations. One of the significant advantages of LED lights is their adjustable brightness and color temperature, allowing creators to tailor the lighting to their specific needs. When using LED lights, experiment with placement—higher angles can create dramatic shadows, while lower angles may result in a softer look. It’s advisable to keep a softening filter handy to further diffuse the light if necessary.
Softbox Lights
Softbox lights are an excellent choice for indoor setups, as they diffuse light and reduce harsh shadows. This is particularly beneficial for portrait photography and filming talking head videos. Softboxes come in various sizes, allowing you to choose one based on the scale of your shoot. When positioning softboxes, aim to create a 45-degree angle from your subject for balanced lighting. Additionally, softboxes often come with different fabric options, so experimenting with them can yield varying effects on your final image.
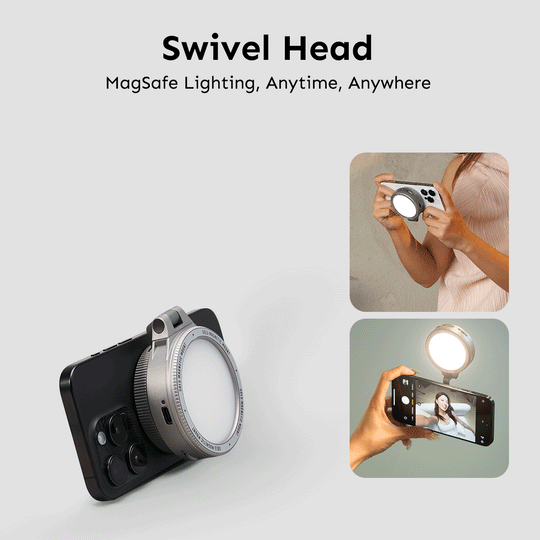
Ring Lights
Ring lights have become synonymous with beauty and makeup content creators, and for good reason. They provide an even distribution of light that enhances facial features and reduces shadows, giving a professional finish to tutorials and livestreams. The circular design allows you to place your camera in the middle, ensuring your face is perfectly lit from all angles. Many ring lights also offer adjustable brightness and color temperature settings, making them suitable for various environments and styles.
Flash Lighting
Flash lighting serves as a powerful tool in both photography and videography. It’s particularly useful for freezing motion and illuminating subjects in low-light environments. Flash units can be mounted on cameras or used off-camera for more creative angles. Understanding how to use flash effectively requires practice, as adjusting the power and positioning can dramatically change the outcome of your shot. Flash can also be used in conjunction with other lighting options for a more dynamic setup.
Tips for Setting Up Your Lighting
Setting up your lighting effectively can make a significant difference in the quality of your content. Start by assessing your environment; consider both natural and artificial light sources available in the space. When positioning your lights, think about the shadows they create. Experiment with different angles and distances to see how they affect your subject. Adjusting brightness is equally important; some setups may benefit from softer lighting, while others may require a more intense light. Lastly, don’t be afraid to experiment with colored gels or filters to add creative flair to your shots. The key is to test different setups until you find the perfect combination that enhances your vision.
Enhancing Your Content Creation with Effective Lighting
In conclusion, lighting is a fundamental aspect of content creation that can drastically affect the quality of your work. By understanding the principles of lighting and exploring various options—from natural light to LED and flash—you can enhance your creativity and produce stunning content. Remember, experimenting with different setups and techniques is key to finding what works best for you. Illuminate your creativity and let your content shine!


